Setting up my Bardolph Webserver
By Perry Piazza
Hi. My name is Perry and I am helping Al with the Bardolph project. Articles that I write will cover my experiences with Bardolph.
The LIFX official App vs. your own webserver
The official LIFX App for iOS and Android is quite good as far as manufacturer
smart device apps go. Within the app, LIFX has a lot of cool and useful tools -
like the snapshot tool, useful for capturing a light’s state numerically (i.e.
once you’ve got it set up the way that you want). A solid ‘routines’ editor
allows you to schedule things - for example a wake-up routine that runs every
weekday but not on weekends, for example. Also the hierarchical organization
functionality is intuitive. You can set up and name places and then optionally
rooms and then devices within those places (i.e. Office > Office Desk Lamp
or Office > Conference Room > Ceiling Light 1). Beyond that you can set
colors, saturation, temperatures, brightness, etc., and invoke some neat built
in shows and effects.
But the official LIFX app may not suit all of your needs. If you’re looking to have a few quick routines that you invoke somewhat randomly but often (like dimming all of the lights in a room in a specific way, for example), the app may be a cumbersome way to get this done. This is where setting up a Bardolph script web server might come in handy. A web server can tie Bardolph scripts to a locally served (i.e. over just your WiFi network) web page/site - for example, a web page that you load on your smartphone, laptop, or smart television. In order to facilitate this you’ll want a local web server that is always on and “listening” for your web inputs, so that it can run Bardolph scripts as needed. A low powered Raspberry Pi or similar SBC is ideal for this task as it is cheap and consumes very little electricity. There is a great tutorial on the Bardolph website here which goes through the step-by-step web server installation on a Raspberry Pi.
In this article, I’ll describe in broad strokes how I set up my Bardolph web server.
Steps
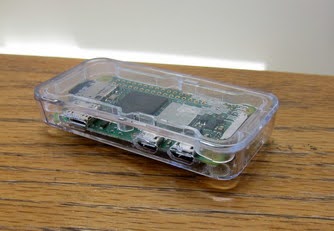
First I acquired a Raspberry Pi Zero 2 and a case (a friend lent me both indefinitely), and dug up an extra micro SD card that I had lying around. Here’s a picture of the little computer which is about 3 inches long.
Next I downloaded the official Raspberry Pi Imager and installed Raspberry Pi OS on the SD card using my main home computer (a Windows based PC), a card reader, and a micro SD card adapter. In the imaging process you can set up your Pi to access and authenticate into your local wifi network automatically on its initial boot-up, and also set up a username, and a password. From here I booted up the Raspberry Pi. A monitor, keyboard, and mouse can be be used at this point (with most Pi models) to further configure the Raspberry Pi, but desktop access (i.e. via a monitor) isn’t necessary, as you can get your web server up and running remotely via ssh - a command line tool for logging into Linux-based computers. Desktop access could be useful if you intend to use the Pi for other tasks, or, perhaps to do Bardolph scripting on-device, but isn’t strictly needed for this project.
I used SSH to access the Raspberry Pi from my PC
(i.e. ssh myname@raspberrypizero.local) making sure that I was connected
to the same wireless network. The username that you created with the imaging
tool will have unlimited read/write rights, which isn’t necessary to
operate the web server. So the first thing I did after logging in
was to create a new user called lights with limited “sudo” rights
as recommended by the documentation. Next I went through the installation
of software - specifically Apache HTTP Server. Apache operates
by listening for incoming requests (typically from web browsers),
processing those requests, and delivering web content back to the
client. It can be used for lots of cool home projects - for example
a private fileserver or a local development server. After installing and
configuring Apache to work as a proxy server - in this case, serving
Bardolph scripts (i.e. Python code) when requested by the webpage, I next
logged in as the “non-God-mode” user lights. As lights, I cloned over
the Bardolph folders and files from GitHub.
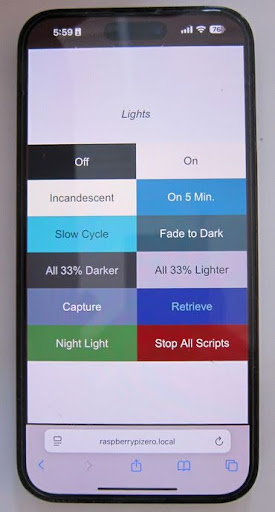
Next I created and activated a virtual environment just for my Bardolph usage and then installed Bardolph using Python’s no-hassle pip command. Still in the virtual environment I installed Flask waitress (pip again), which is a resource-light and flexible web application framework and then fired it up using the included python script. Once that’s done, you should be able to access your Bardolph web server from any browser enabled device on the same network via an http url - in my case http://raspberrypizero.local/. There is a document in the folders (manifest.json) that configures and controls what Bardolph scripts get invoked via the web server and also controls things like button colors so it’s easy to change the scripts referred to by the buttons by editing the json file in a text editor either via the command line or using the desktop Pi OS. json structure is not too dissimilar from, say, html or CSS, so make sure you follow syntax.
How it looks and works
Below is a picture of the application loaded into Safari on my iPhone. I set up a home screen link that automatically opens the browser to this page. On my phone, to activate a script I just press the button.